TtRPG Abandoned Riverwheel (Part 3): Creative Destruction of 3D Printed Spoked Wheel, Axle, and Gear
The Outer Area
In the initial list for this mill, I included both the building and its surroundings. Pieces that need to be created to place outside the mill include a water wheel with only some paddles intact, and a large gear that’s lying on its side. I had also suggested an overgrown garden, so I’ll design a cobblestone fence for the garden area. It may or may not be broken up.
I’m going to design the water wheel and shaft first, starting with the shape that I used to cut out the space in the walls and floor where the waterwheel shaft used to be. When I earlier created the shaft shape, I added a cylinder to each end. One cylinder was large and the same dimensions as the water wheel, while the smaller cylinder on the other end of the shaft represented a similar-sized gear. The shape I’m creating now needs to perfectly match the size of the simpler model that I used to create the earlier space.
First, I used the search tool in the shape area, and typed in ‘gear’, which returned a nice number of shapes to choose from. I picked the one closest to the gear I wanted, then changed the dimensions to represent a 5’ diameter gear that was 3’ wide. I then moved it around a bit to make sure it was the exact size as the plain cylinder it was replacing, and it was.

Gear and Shaft
I then started on the 15’ long shaft that connected the water wheel to the gear. The pole scaled down to 8.25” long on the model. I thought 4” was a fine realistic diameter, but I could see now that it was ridiculously thin on the model (.18”). Besides, the hole in the center of the premade gear was a near-perfect .5” in diameter, which worked out to 1’ diameter if the gear was life-sized; on trying it out, the .5” diameter piece looked sturdier and more sensible. I went with the new spec: the pole would be nearly a foot thick instead of 4”.
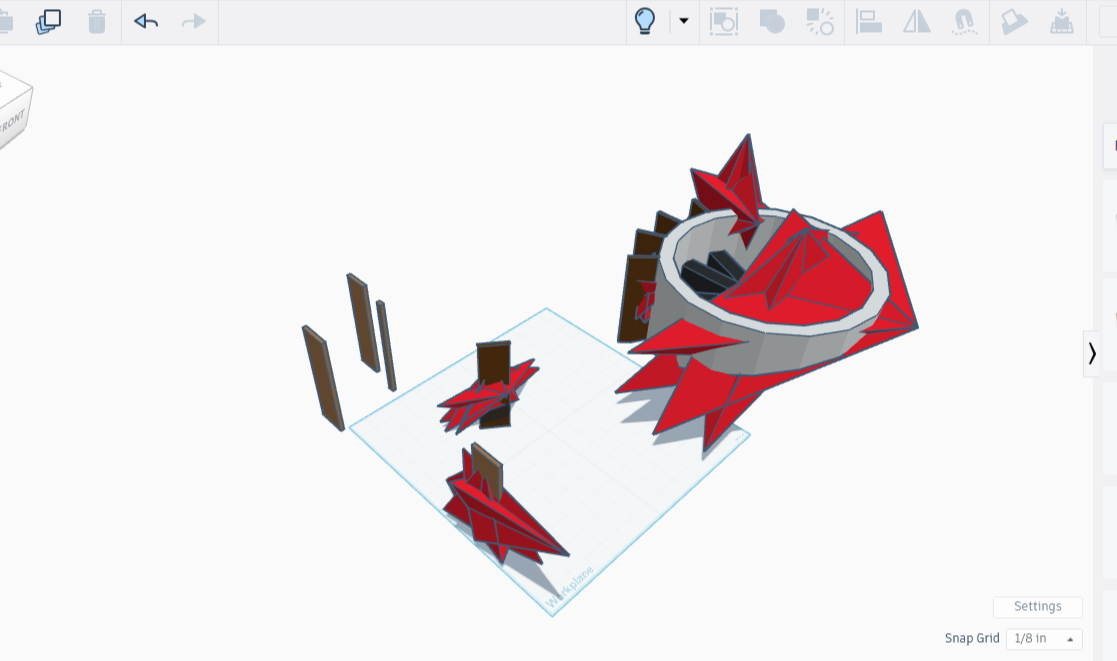
To finish this part, I first needed to turn the larger cylinder into a waterwheel. Hmm, how to do this? I first typed in paddle wheel into the shapes searchbox, to see what came up. There were a couple types of wheels that looked promising, but my favorite was the old-fashioned car wheel.
I plonked a copy onto the workplane, sized it up to 11” diameter and 5.5” wide for my 20’ diameter water wheel, then used a cylinder-shaped eraser to lop off the weird looking oblong thing sticking out of one side. I’m not sure what the piece is supposed to be, but I don’t want it on this! The wheel now looks amazing — it just needs some paddles and it’s done. Oh, and possibly a little ‘creative destruction’, to make it look properly abandoned.
For the paddles I made rectangles that were long enough to run across the watermill, but not very thick or deep, 5.5” x 1.5” x .125”. I hope that’s thick enough to be realistic; it is a perfect fit for the wheel that way and it looks really nice. I’m going to spam a few copies of the board, attach some to the wheel, and break a few more to place nearby. The assumption is that most of them have long since been carried off for firewood, or drifted downriver.
After adding a few paddleboards and attaching them, I started on destruction. First, I created a thick star shape, copied it, tilted the copy 90 degrees, merged the two stars, then set the jagged shape aside. I then went after the wheel.
A rather large cube-shaped eraser, tilted at a jaunty angle, removed a huge chunk of the wheel, leaving very little in the way of spokes or paddleboards.
I made several copies of the star-shaped blob, then stretched out each copy until I ended up with several jagged bits of varying size. I strategically placed these on the wheel and board remnants until I had only two boards remaining. One I left alone, the other I split in two lengthwise.
I then turned all the jagged blobs into erasers, and disappeared huge chunks of wheel and board. It looks amazing.