Print-In-Place for Beginners (Part 1): Designing Flexible Strips in Tinkercad
Printing in place doesn’t mean standing in one place, hovering over your 3D printer until it finishes printing. Not that I wondered if it did for more than a moment or two anyway before realizing that was silly.
According to the Beginner’s Guide to Print-in-Place on Thingiverse, “any 3D printable design that has moving or interlocking parts that are built as one continuous print job falls under the print-in-place umbrella.”
The guide goes on to explain all the steps required to 3D print a print-in-place model, which is fantastic. ‘Calibrate your printer’ sounds like an amazing first step. I have to say, I helped assemble the Sovol, but that doesn’t mean I know how to do very much with it. I’ll learn how to calibrate it, but not right now.
Not only does it explain what print-in-place is and how to 3D print those types of models, it even discusses where to find them. I linked the guide below, in case you want to read it. It’s quite good.
Fantastic as these tips are, I really want to dive into the design side of things. Rotating platforms sound like they would be nicer if they were made of one single piece, with spheres already inside. I want to make one of those today. I will explore some other things we can do too :)
A Partially Flexible Bar
Aaaaaaand Jackpot! I found a YouTube video by Slant 3D. They have extremely useful content, and a level of enthusiasm that I can really appreciate. Let’s take a look at Learn 15 Print-in-Place Mechanisms in 15 Minutes, also sourced below.
Gosh, these guys really know how to present videos! I’ve watched a few things from their channel and I’ve been impressed with how well they know their stuff, as well as how they are able to translate big concepts in ways that a layman like me can understand. Their experiments also look like fun.
Anyhow, I like one of the first things they presented: how to make something flexible. I’m going to design a flexible something right now.
I wanted to make a useful item using this principle. A custom sink stopper seemed like a good use of this technique. It would have a good grip as well as a better fit if I made the holed portion into a slightly flexible wide rim around a tapered plug part. I even took dimensions and made a sketch. But how to make the oval-ended arc shapes? I’ll work on that later, because I really want to know. It will probably take a long while to figure out though, and I’m itching to try this technique now. I’ll try making a flexible mat, and work on the sink stopper idea later, probably with its own article.
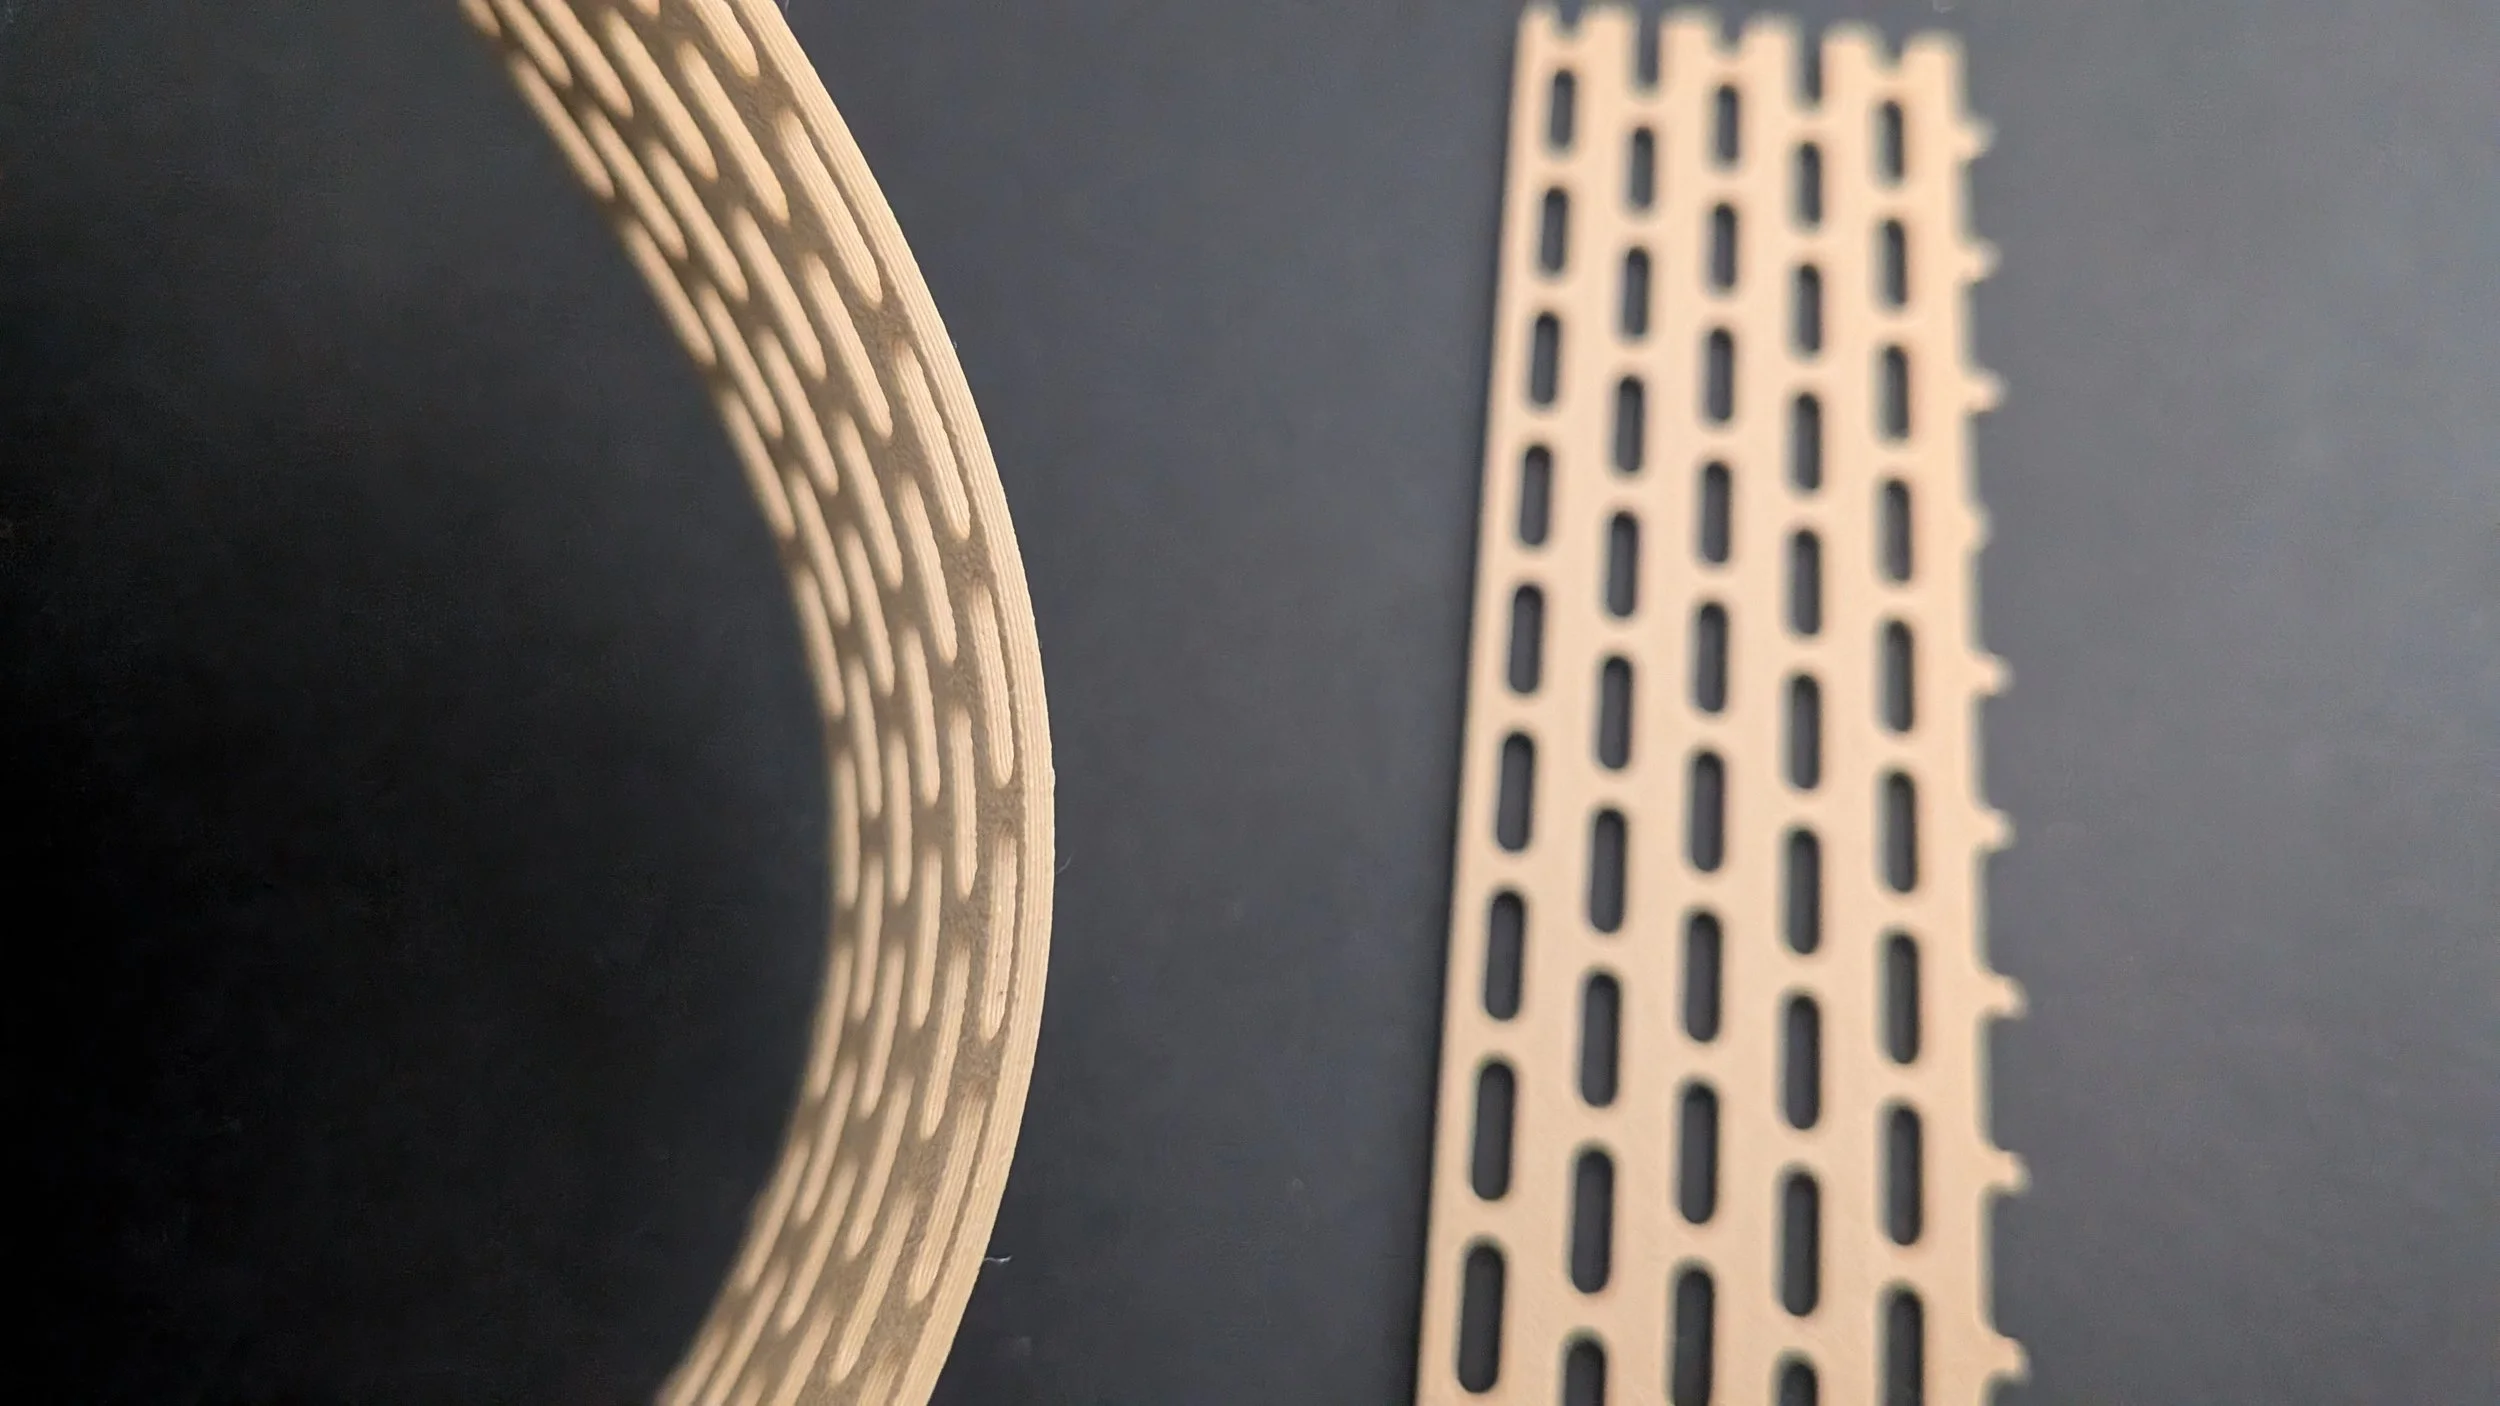
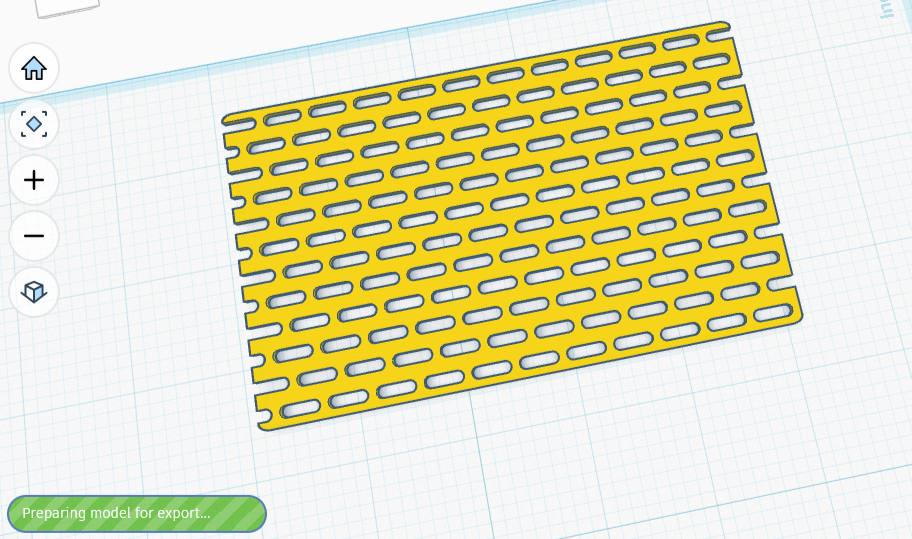
The flexible strip appears to be made up of lines of oval shapes end to end, with only narrow strips of space between them. Every other line is shifted up a half-oval, so the entire near-flat plane is covered by alternating strips.
It looks like I will need to make only two shapes for this: a thin narrow strip, and a skinny oval. Looked at that way, it’ll be easy peasy.
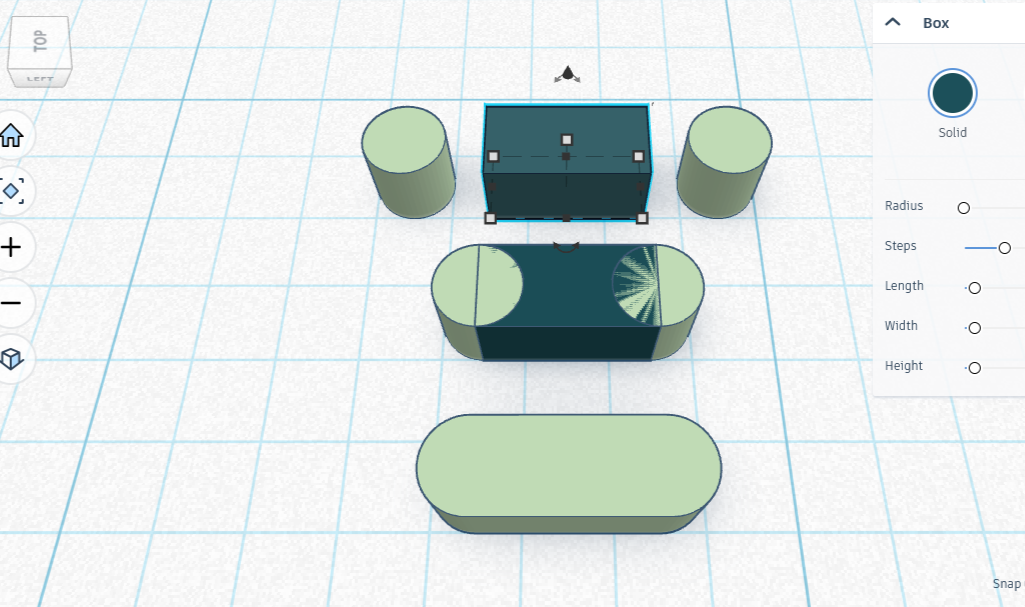
I first made the plane, a 3" by 5” rectangle only .05” deep. I then clicked on the shape to bring up the rectangle menu, and set the ‘radius’ option to .02 to round the corners. The rectangle should be around 4 or 5 layers high when printed, really small, shaped and sized like a credit card.
Next, the oval shape. I first made a pair of .125” diameter cylinders, then lowered their height to .125” also. I added a rectangle .125” thick and .25” long, and the same height as the cylinders. I then placed one cylinder on each of the long ends of the rectangle, making sure that exactly half of the cylinder stuck out from the rectangle. The other half of each cylinder was lined up so it would merge with the rectangle, forming an oblong shape .375” long by .125” thick.
I then duplicated the oval shape, tried spacing the ends .0625” (a sixteenth of an inch) apart, but Tinkercad wasn’t having any of it. It rounded it to .062, first off, and second, would not snap into place at that offset for anything. I ended up moving it manually by dragging it, then entering the distance I wanted the shape moved. Problem solved! Except when I made a third shape, I had the exact same problem. Same solution, but grr. It comes from choosing such a small size.
Once I had three shapes end-to-end, I copied the lot, then scooched it down so that the first one of the set overlapped the last one of the old set, ending up with a group of five perfectly aligned end-to-end bits. I did have to move it over by .062” though to make it exact. I duplicated the set of five, overlapped its first oval shape with the last oval shape of the other set, and voila, I had a set of nine aligned shapes. Again I had to offset it by .062 to do so, but it’s hard to complain (too much!), as it looks amazing. I did this over and over until I had a line longer than the credit card shape from earlier.
I then took that line of ovals and copied it. I placed this copy beside the first, so that I had two lines side by side, only .125” apart. I colored the second one a contrasting color, then offset it by .125”, which of course did not leave them spaced by the right amount. Grr. I added another .062” more, and it was a perfect offset. Cool, I now had a repeatable pattern for finishing the job.


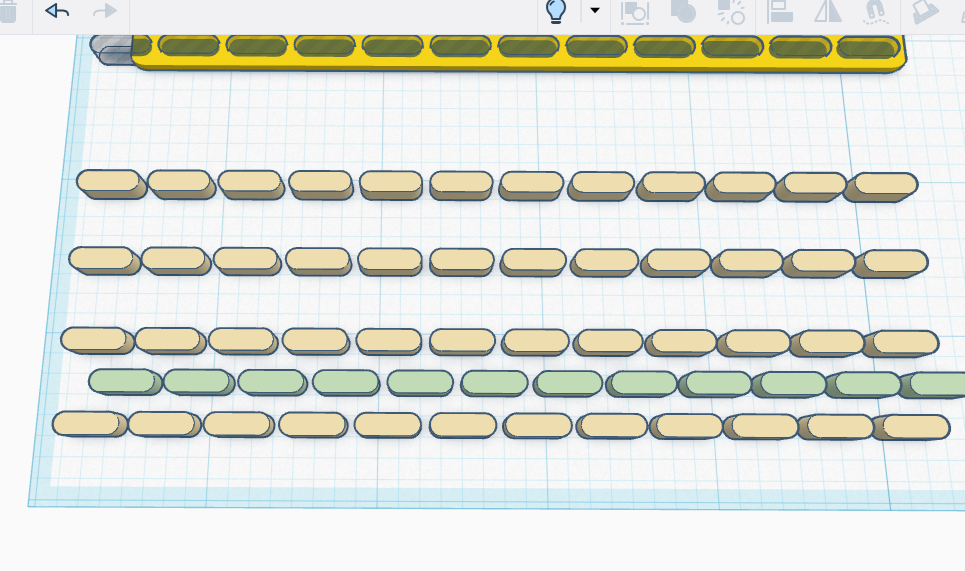
It would have been super clever to just copy this pair of lines, then use the same copy and overlap technique I did earlier, I see that now. Unfortunately I did it the long way and copied each long line, followed by each short line. This meant that I had to add an offset every other line; the duplication of work here was so unnecessary.
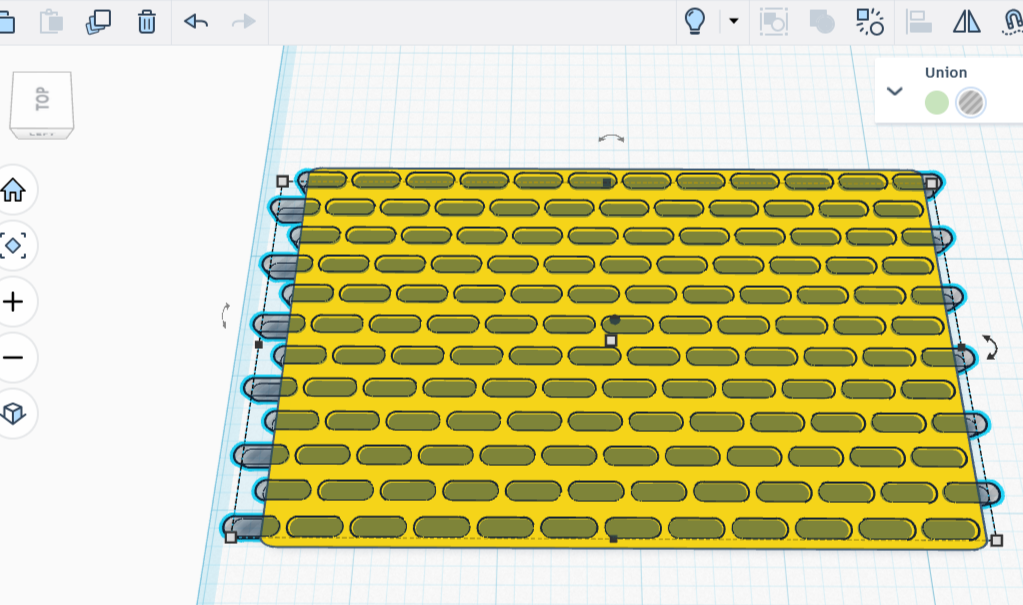
Well, I finished the pattern and it looks great. I joined the pieces together, after making sure they fit over the credit card shape with some room to spare on either side.
I carefully placed the finished pattern over the credit card shape, making sure there weren’t any floating bits or weird bits. Models automatically snap into place on the grid in increments of .125”, and the fit wasn’t quite right. Guess how much I had to offset the pattern by for it to fit nicely on the card? If you guessed .062”, you were absolutely right!
I next used the align tool to center my pattern so that it stuck out both above and below my credit card. I was about to turn the pattern into negative space, and wanted to make sure that the holes went all the way through.
After that, I merged the carefully aligned negative space with the flat credit card shape. It came out pretty well. Time to test it out with a print!


While that’s printing, I’m going to work on an improved Lazy Susan design, one that uses print-in-place! I’ll get back to this section when the print is done — it won’t even take an hour! Meanwhile, on to part two, where we will learn how to make print-in-place rotating parts.
—> Promised Update! The flexible piece bent one way rather nicely, but it wasn’t so forgiving of being bent lengthwise. Not even a bit! The two smaller pieces created by trying though, bent rather easily, so long as I gently bent the ends towards one another. It had enough give to form a full crescent shape.