Rapid Prototyping: 3D-Printed Sink Plug Bonanza (Part One)
Earlier I made a sink strainer, composed of two parts: a flexible outer ring, and an inner plug that had a well with a knobbed handle in the center. It was good enough for the moment, but not good enough. I kept thinking of all the adjustments I could add to make it better. I could probably have written an article or two more about making sink plugs and strainers. Instead, I opted to learn, share, and experiment with rapid prototyping.
First, a definition. According to the Cambridge Dictionary, prototyping means, “the activity of making basic models or designs for a machine or other industrial product: a prototyping system/process”.
How is that different than ‘rapid prototyping’? Wouldn’t you always make your pre-versions quickly? I turned to Google for answers, and that led me to DesignTree’s website, where I learned so much!
While the detail given about traditional prototyping is extremely interesting and worth a read, my take-away for the purposes of this article is this: Prototyping generally involves real-world mock-ups made of materials similar to that of the real thing. Rapid prototyping means doing it quickly, via CAD, where a model can be drafted with considerably more speed than one which requires layers of brick and concrete, along with real wood and a full-on paint job.
Or, in my case, it means making as many different sink variations as I can, within a limited timespan. If I don’t put a limit, I will be doing this forever. I’m not going to document them, beyond a couple of screenshots and some notes — I need to be mindful of what I’m making, in case I want to repeat it, but the idea here is to be rapid.
Taking Measurements
Before I begin, I’ll list my precise drain measurements, then those of a common drain or two. I’ll work in bursts til I hit six hours. I should be able to get more than a few of my ideas out by then!
My caliper can’t reach across the drain because the sink gets in the way. I want good measurements though, what to do? I thought up a solution: adding a 3×5 index card and a pen into the mix.
I held the index card across the widest part of the drain, with one edge of the card touching the drain’s wide edge, then made a mark on the card where the opposite side of the drain ended. I repeated the process on the outer ring surrounding the drain, a band that slopes downward from the sink to channel water to the drain. Lastly I noted the width of the widest spot across the final ring, which was around the sink drain, right before the drop. The caliper applied to the notations on the 3×5 gave me the numbers I needed.
Drain Hole: 90mm
Outer Ring: 115mm
Distance to Sink: 125mm
There’s a slight drop where the sink meets the outer ring — it was incredibly hard to measure, both with paper and with the caliper, due to its curves. I tried eyeballing it first, then remembered I had a 3D-printed protractor in my toolbox.
While it was still impossible to get a tool in place to measure it, I was able to take a picture of it. I then compared the close-up image to my protractor — my best guess is that it’s 60 degrees.
Okay, we have all the numbers, I even know that it’s a 40mm drop from the mouth of the drain to the end of the metal… whatever that piece is called in the sink. Now for the happy fun times :)
Printer Settings
.16mm Optimal @BBL X1C — because I think it will look better with fine layers
Support: Enabled, Type: Tree (auto), Style: Tree Slim — tree supports seem to come away cleaner, and slim because this is still a prototype and I want to go easy on the filament.
Build-Plate Only - checked because prints look cleaner
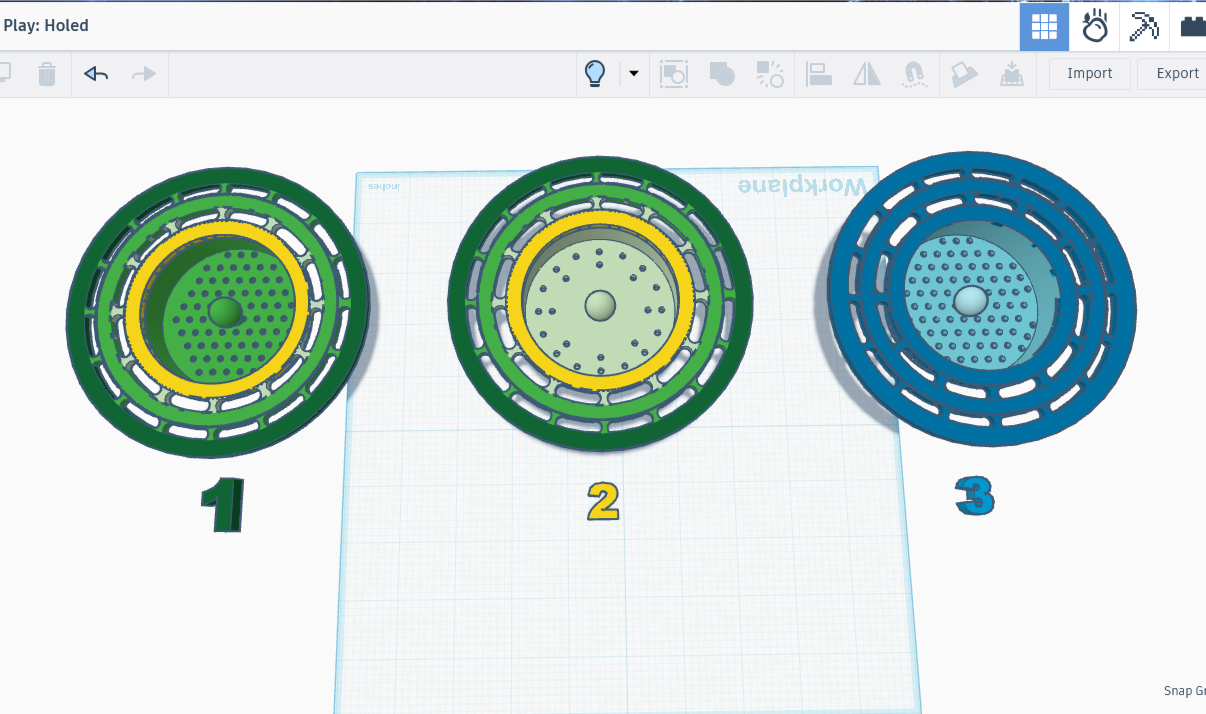
Making a Better Strainer, v1
Deepened the well so the holes wouldn’t be long tunnels of potential food jamming
Switched to inches before making holes solely because I can better visualize Imperial units before drafting them
Made .125” cylindrical holes in alternating rows, covering the floor of the well (drainage)
Shortened the handle to a stub and the top to a sphere, still easy to grab but less in the way of food.
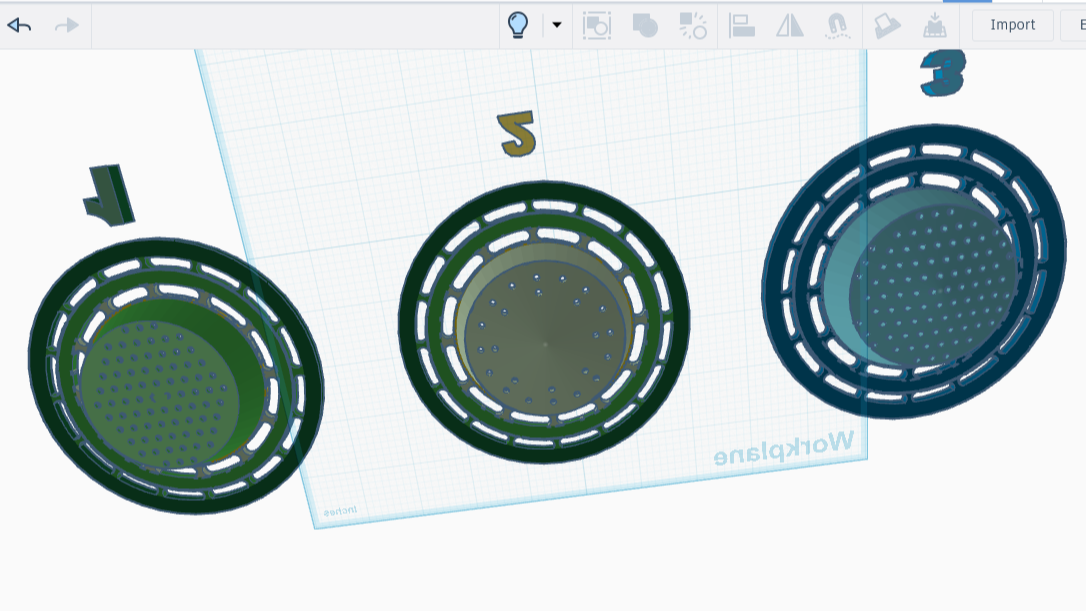
Making a Better Strainer, v2
Added a near-flat upside-down cone to the bottom of the well, so that liquid dripping down could come to a point. I like the idea of water not sitting, but this is likely gratuitous considering the strainer. The drip collector isn’t in the way of anything, I like the look of it, it still can collect a little bit, and I want to see if it works because I am sure I’ll need it later.
Removed the holes, and replaced them with 2 rings of holes instead, for aesthetic purposes. There are fewer holes now, but it looks nicer.
Notes: Kept the deep well and the new handle, those are likely winners, though I won’t know til the first print finishes.
Making a Better Strainer, v3
Copied the array of holes from v1 (large patch nearly covering base), then added more pegs to make it more symmetrical before re-holing
Copied the drip collector from v2 (upside-down cone on the bottom) because I really like it.
Result:
I love the third version. If the print comes out well, I am done making sink drains for the kitchen. This is the most perfect drain imaginable, at least in my mind. Though making a companion with larger holes for unimaginable reasons might not be so bad. adds idea to thought palace
Making a Plug for the Kitchen, v1
Copied the v3 Strainer, as the rim and plug size were mostly satisfactory.
Broke apart the center, removed the strainer holes and well space, and widened the center for a better fit.
Squished the knob and widened it a great deal. There’s no longer protective space for a knob, since the well is gone, and I need a handle that isn’t easily crushed.
Removed the smaller of the two flexible holed outer rings, and replaced it with a plain ring, getting rid of the sieve because it overlapped the drain in the original model.
Widened the new ring and one adjacent ring by .01, for a tighter fit.
Making a Plug for the Kitchen, v2
Copied v1 Plug because it looked close to good
Replaced the flexible ring with a plain ring. This will make some future ideas easier to implement (thinning the border, lessening points of contact). I am trading the remaining flexible pieces for potential.
Widened the new ring by .01, for a tighter fit
Results So Far:
The strainer has made a monumental difference in our household: the only things to fall into the garbage disposal are the things that are in the cup of the drain, and they fall in only when a person tips the stuff out. However I dislike the rough texture around the holes, a problem created by the supports I added when printing it upside-down. I printed it that way so that the tipped bottom (dripping mechanism) would be perfect, but the roughened hole area is too high a cost, as it catches little bits of dirt and stain over time. It’s starting to look a bit gross, and I am 100% confident that it’s germy. I’m gonna print a new one without the drip mechanism, as that turned out to be both unnecessary and problematic.
The plug needs to be bigger, and have more compliance (flexibility). As is, it’s functioning like a slow drain. Anyhow, since I’ve only burned through an hour and a half, it’s time to get back to the project! I’ll redo those models then print and post the results. However, I planned for six hours, and even assuming the adjustments take a while, I’ve still barely bitten into the six-hour timer. This project is continuing in part 2, where I’ll be moving on to the drain in the bathroom sink.