Rapid Prototyping: 3D-Printed Cabinet Organizer Extravaganza (Part Two)
Forget the bonanza, let’s go for the extravaganza! First, updating the sink strainer model. I’m still using the old one, but it has reached uncomfortable levels of eye-sore. The rough spots where the supports came up around the holes are really hard to keep clean and nice, so a reprint without those bits is in order.
Updating on the Kitchen Strainer
The first reprint was sloppy because I added a brim. I thought that it would help with the supports, but instead the brim made a thin layer that was impossible to peel off the bottom.
I did one more print, this time upside-down and no brim, and it’s perfect.
Why Design An Organizer for the Medicine Cabinet?
I set out to do 6 hours of prototyping. Redoing the strainer pushes us firmly into the 2-hour mark, less than 4 to go! Now for the bathroom, where I am going to work on something else: a medicine cabinet organizer. There are shelves that have enough area to hold a lot of small things, but we simply have too many small unstackable things to make good use of that space. That doesn’t even account for some larger things that should be in the cabinet too.
The easier solution might be just to print some more shelves for the cabinet and move the bigger things under the sink. Though that solution is easier, it isn’t really better for me. Between the cupboard under the sink, the actual sinktop itself, and the medicine cabinet, I could fill a small closet. I already printed some nice organizers for below, which created a lot of space. Unfortunately I simply can’t reasonably fit anything more down there. So medicine cabinet organizing it is, which should free up a good bit of counter space.
Taking Measurements
The area I want the organizer for measures 3.5” deep, 9.25” high, and 12.0” across, though it doesn’t have to reach the max on any of those spots. It needs to have shelves that can hold mini-tubes of toothpaste, small bottles of cologne, razors, and some jars and tubes, none too large. These small things need to co-exist with items that take up nearly all the height, and those items cover nearly half the width of the cabinet, though they can be smushed together a little bit if need be.
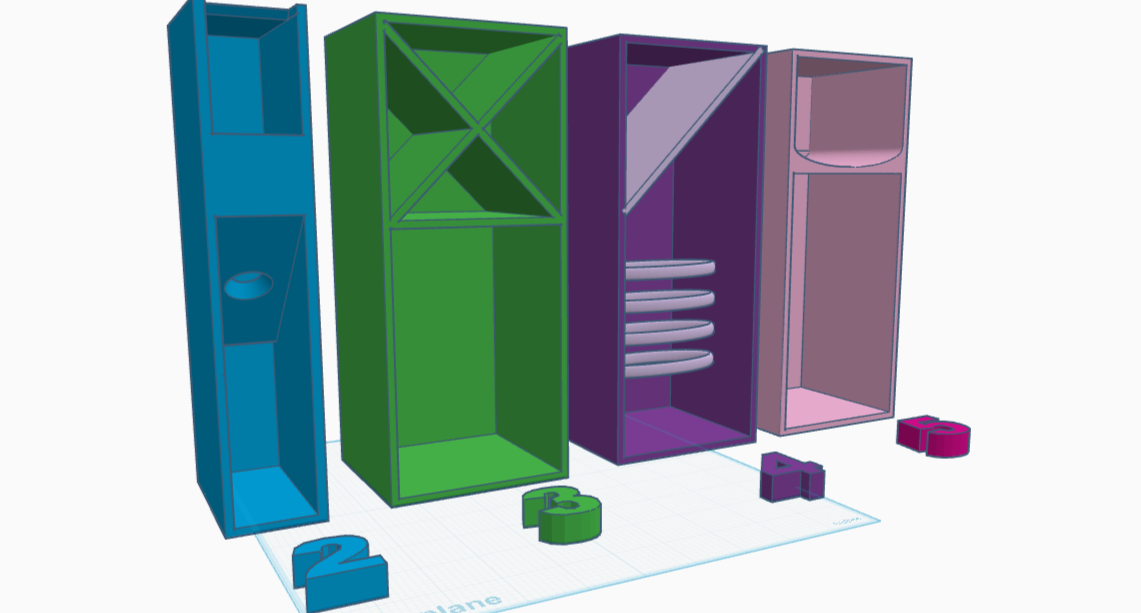
Angled Bins, an X-Shaped Divider, a Series of Rings, and a U-Shaped Bottom — What Works?
Features
Some features that might help: angled panels so that tubes and such can fit in
Scoop shapes for ease of grabbing things
Lip on shelves so items don’t fall (maybe)
Medicine Cabinet Shelves, v 1.0
half the medicine cabinet wide — 3.5” deep, 9” high, and 6” across
added two sections with shelves
added a section with angled bins so that tubes and razors can fit well without falling out
fused the sections, all walls and back .125” thick
Printed at .20mm Standard, 10% infill
Results
It took an entire hour to figure out how to make those angled portions, and imo they are somewhat unattractive. Also, I guarantee someone will put something too small into one of those sections and it will get stuck, necessitating the removal and upending of the entire piece just to get it out again. Ugh, or it could get jammed. I’ll address that next iteration — I’m in love with the idea of having those angles and can’t let it go, so I’ll have to address the problems that can come with such a design.
While the first version has the sections fused into one solid piece, I’m going to print each different potential piece separately for the rest of this series. I can still evaluate how well the different pieces work for my needs, without using near as much filament. I’ll only need to print one of each piece this way, and I can artificially place them side by side to see what looks nice or works best.
The width will not do at all. The only thing that could fit in the angled section is a toothbrush. This section needs room for things to poke up if they are too tall. It also needs to have a thin snip missing from the bottom of each angled section, giving room from which to poke things upward if they get stuck inside.
Both sections need to be wider to fit anything of substance, and the entire apparatus needs to be taller.
Medicine Cabinet Idea: Angled Bins v 2.0
made the section width 1.5” inside (wider bin)
added a small panel on top of the part where the bin starts to angle — makes things stand more upright
added a missing rectangle on the top like the kind you pour boxed pancake mix out of, giving room for things that are just a little too tall
placed a second section underneath, making the angle of the overhanging top bin into a sort of roof for whatever goes below
added a half-cone that joins the top and bottom bin. the shape is at a 45 degree angle, the wide part open on the roof-like portion on the bottom container, and the smaller hole in the bottom of the top bin, creating a hole that can be used to poke things out of the upper bin if they get stuck
still not pretty, at least on the workplane
Medicine Cabinet Idea: X-Shaped Divider Top and Tall Bottom v 3.0
has a square slot on top with an x-shaped divider in it
has a taller space underneath
Medicine Cabinet Idea: Ringed Razor Holder and an Angled Shelf v 4.0
has stacked rings with lots of space between them, a visually pleasing razor holder
added a shelf at a jaunty angle, near the top, allowing space for larger razors (or whatever!) while creating another storage spot for something small
Medicine Cabinet Idea: Curved Top Section with Tall Bottom Section v 5.0
has a wide u-shaped bottom on the top bin, which is rectangle-shaped
the bottom is very tall
Results:
I managed to outrun the clock, passing the 6-hour mark while doing the last piece, the curved top with a tall bottom. I have not yet printed them all, but I’ll update this space as I do! Meanwhile, here are the results.
The angled piece (v 2.0) looks much better in reality than it did on the printbed. It has a great width, and can hold a Tide stain pen or a tube of neosporin with the same ease and accessibility. If it were to hold toothbrushes (it is not) it would have to be an inch deeper — I tried and the head stuck up a rather lot.