Print-In-Place Ball Bearings (Part 2): Following an Instructables Tutorial
Making objects that can move is something I’m really excited about. I already have two successes from a mechanical perspective: the rotating platform I used for our game’s goblin fort, and a pair of custom spinnable containers for an artist.
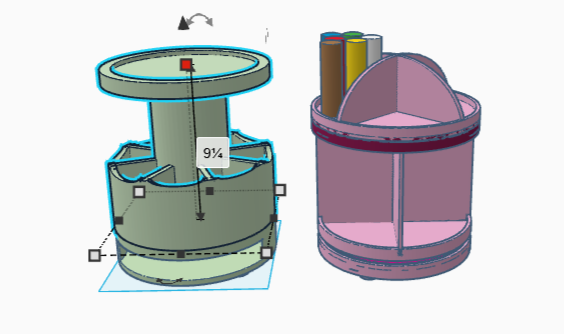
The containers are something I’m particularly proud of. One had a stationary base with a deep horizontal slot for holding palettes, topped by a rotating paintbrush holder, which in turn was topped by a rimmed base sized to hold a repurposed Lazy Susan.
Complicated, but cool, in my opinion. For the other container, I sectioned both the top and bottom tiers, and mounted them each on rotating platforms, one on top another. The tiers are designed to hold a specific brand of paint, which comes in only one size.

I know that I could make a better rotating design. What if I could design the spheres so that they were inside a solid piece, instead of separate plates? They wouldn’t fall out if the piece got knocked over. They would probably be smoother, not being printed on a flat mat. And most importantly, they would be invisible. The platform would work like magic. I want to know how to do this.
I went through the rest of the 15 Print-in-Place video, and wow, again. Unfortunately I didn’t see anything on this type of rotating design. I did however make note of some really cool things I could do with these ideas. Another time though. If I’m going to design something print-in-place, I should get some practice.
Making 3D Printed Ball Bearings Using Print-In-Place Technology!
Making a 3D Printed Print-in-Place Ball Bearing Gadget
For the first project, I’m going to follow a tutorial I found on Instructables on designing print-in-place ball bearings. It has lots of images, exciting! I linked it below, if you’re interested. I recall reading something about using cylinders instead of spheres for print-in-place rotating objects, so I’m going to look into that as well.
But before that, the ball bearing print-in-place tutorial! I started on it, stopping halfway through. When I went back hours later, I was thoroughly lost and messed the steps up so badly that I ended up having to scrap the whole thing and start again. I even managed to move the spheres out of position in such a way that they were never going back. The only thing I didn’t end up wrecking was the torus, and at that point I binned what was left.
New try!
Okay, I got stuck on step 8 of the tutorial. What I didn’t do: read the rest of the tutorial to see if the answer was there. Instead I ran it through ChatGPT to see if I missed something; I had not. It complained about the wording, but it turns out the wording was perfectly fine. The problem was that I hadn’t done the last step, labeled ‘supports’, because I made a big assumption about what the tutorial meant by supports. What it meant was the side supports, necessary for the model.
This misapprehension, along with not reading it all the way through ahead of time, cost me probably an hour, maybe more, of unnecessary pain. I’d say I’ll know better for next time, but I knew better this time and still skipped it. Ugh! Anyhow, my model looks really good. I’m printing it now!
Things I learned while making this model:
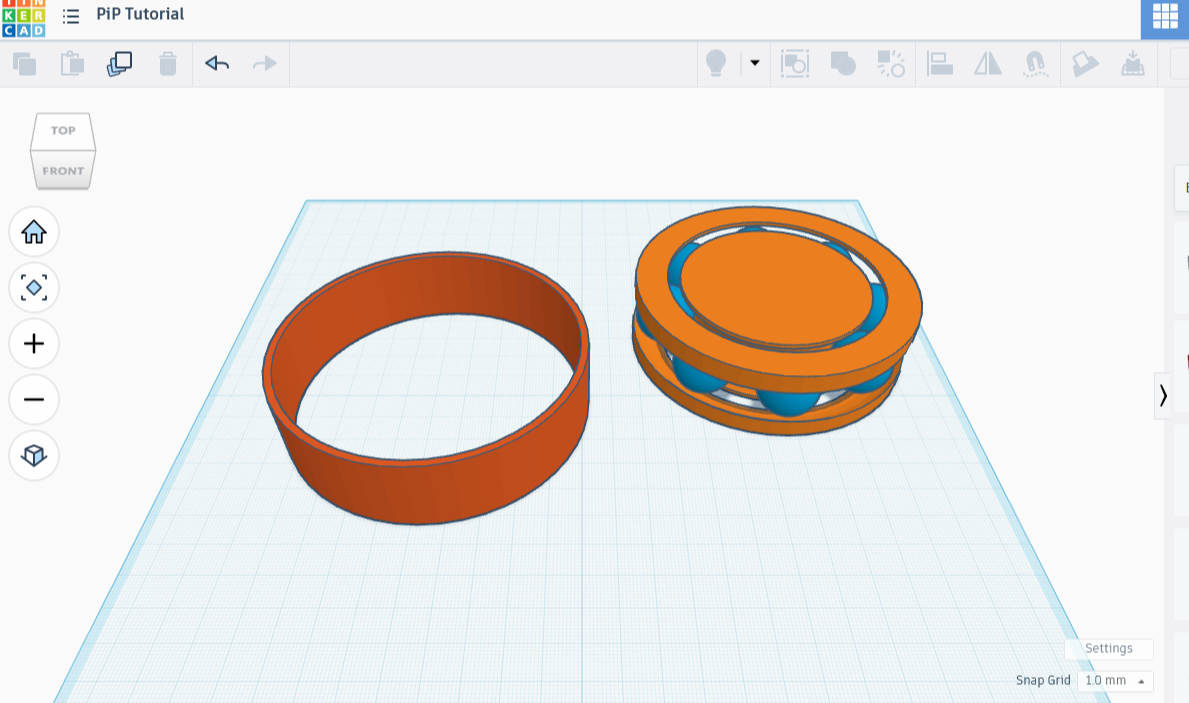
To make this type of print-in-place ball bearings requires a nested pair of rings, with a torus-shaped track running between the two. The spheres that are printed in between those rings form a ring of their own, a rather close one. The space between the rings is sized just enough that the spheres can’t slip out between them.
The space between the rings is also sized just enough to get the supports out, whether by snapping with tools or shaking loose.
If the spheres had more space between them, a cage or spacer would be required. Those are parts of a design that keep the spheres from moving around and bumping into each other; all they do is roll in their designated spot.
And a reminder to read the directions first! eep
All that said, once the print came out, I realized I had only printed six balls. Six!!! I even noticed that my read-through mentioned eight, and I ignored it completely, designing and placing six spheres instead. Well, the design was amazing, I have to say. The only problem was one of my own creation: having so few spheres meant there was enough space to tip the center sideways and remove a sphere. Terrible as that was, I could see the proof of concept. It would clearly stay together if something filled the space between the spheres, whether that was more spheres or a spacer.
I whipped up a second printable version rather quickly, then popped a cap over it. I made a different mistake this time, and it came out horribly. I could still see how it would work perfectly if I’d gotten it right.
I don’t know what came over me, except to say I was honestly rather flustered and more than a little annoyed by this point. While I was trying to follow the tutorial on print-in-place ball bearings, I had another print running on the Sovol, and it was giving me some complaints.
At Last, A Beautiful Container!
I was trying to color that print with the print/pause filament-switching technique, when I accidentally cancelled a print. All the work so far, gone with a single push of a button. Clean the tray, change the filament, start over. Then I hit the wrong button again halfway through a different print, this after struggling to get the whole blasted thing going in the first place.
I kept getting up from this pleasant article to deal with an increasingly frustrating problem that ended up costing a good bit of filament, in addition to some hopes. A little bit of that frustration seems to have been eating up my headspace! I think it no coincidence that my work started getting better once the print finished.
Enough backstory: I’ve now designed a flexible strip, and twice made a flawed set of ball bearings from a tutorial. That’s three print-in-place objects; while two failed, they were still successful as proof of concept.
I am ready to redesign the Lazy Susan from earlier, using my newly found powers! The question is, do I use ball bearings or cylinder?
Cylinder Bearings or Sphere-Shaped Ball Bearings?
I asked Google AI Overview about the difference between ball bearings and cylinder bearings. According to the AI, “The main difference lies in their contact area: Ball bearings use ‘point contact’ for high speeds and lighter loads, while Cylindrical roller bearings utilize ‘line contact’ to handle heavy radial loads”.
That makes sense — how much of the bearing is taking the load? A cylinder touches all along the line; I can see how it could take a heavier load, but this specifies “radial”. What is a radial load? Answer: the load that pushes into the radius, a response clearly in English but insensible.
I then asked ChatGPT to explain the concept. Apparently a radial load is the pressure you use when pressing the side of a glass of water, for example, whereas the axial load is the load that pushes down from the top.
I feel like this is relevant to the way a 3D printer puts down layers, because one orients prints so as to reduce the stress lines. I checked again with Chat (boy it’s been quite the reference today!) and apparently this is correct: reducing the stress is another way of saying reducing the load.
Which type did I end up choosing? Find out in part three, as we design a 3D printable rotating platform using print-in-place technology.
Bibliography
rplatt3
How to Design a Print-in-Place 3D Ball Bearing (With Pictures)
Instructables