3D Printed Custom Nightstand Organizer (Part 1): Planning Stage and Creating Wave Patterns

Jewelry, Accessories, Perfumes, Trinkets, Mementos, Heirlooms, and a BROKEN MIRROR!!
I had some perfumes and knickknacks on a round mirror gracing my nightstand, but then someone broke the mirror (!!!). The glass bottles once reflected so prettily, as did the trinkets, but that crack was a nasty one, and the space looked awful. I’m going to come up with a solution: I’m going to design a custom space-saving multi-tier organizer in Tinkercad to hold perfumes, accessories, and more.
My nightstand is rather crowded. I managed to fit all this on it: a hair-tie tray, a hair ribbon holder, jewelry box, necklace holder, tiny basket, mirror acting as a perfume tray, and numerous knickknacks. That was a space-bending miracle that I don’t think I can repeat. This time I’m building UP!
Here are some considerations:
Items need to be visible and accessible
It has to keep my things from being easily knocked down (cat)
Round shapes and curves are a better style match
It needs to hold glass bottles of various sizes and shapes
It will also hold lots of hair clips, knickknacks
I’m thinking of low rails to hold pretties on a lower tier, and high rails on the top. A cage-like bin below could hold hair clips. A pattern that has lots of negative space, like a net, could showcase the bottles while keeping them in place.
I love the look of a shelving unit I made earlier, and am thinking of making something similar in style, but more resistant to cats. While I’m not a big fan of chunky builds, I think I can make this one look good. Time to put some of that art practice to work!
The Top-Down Approach
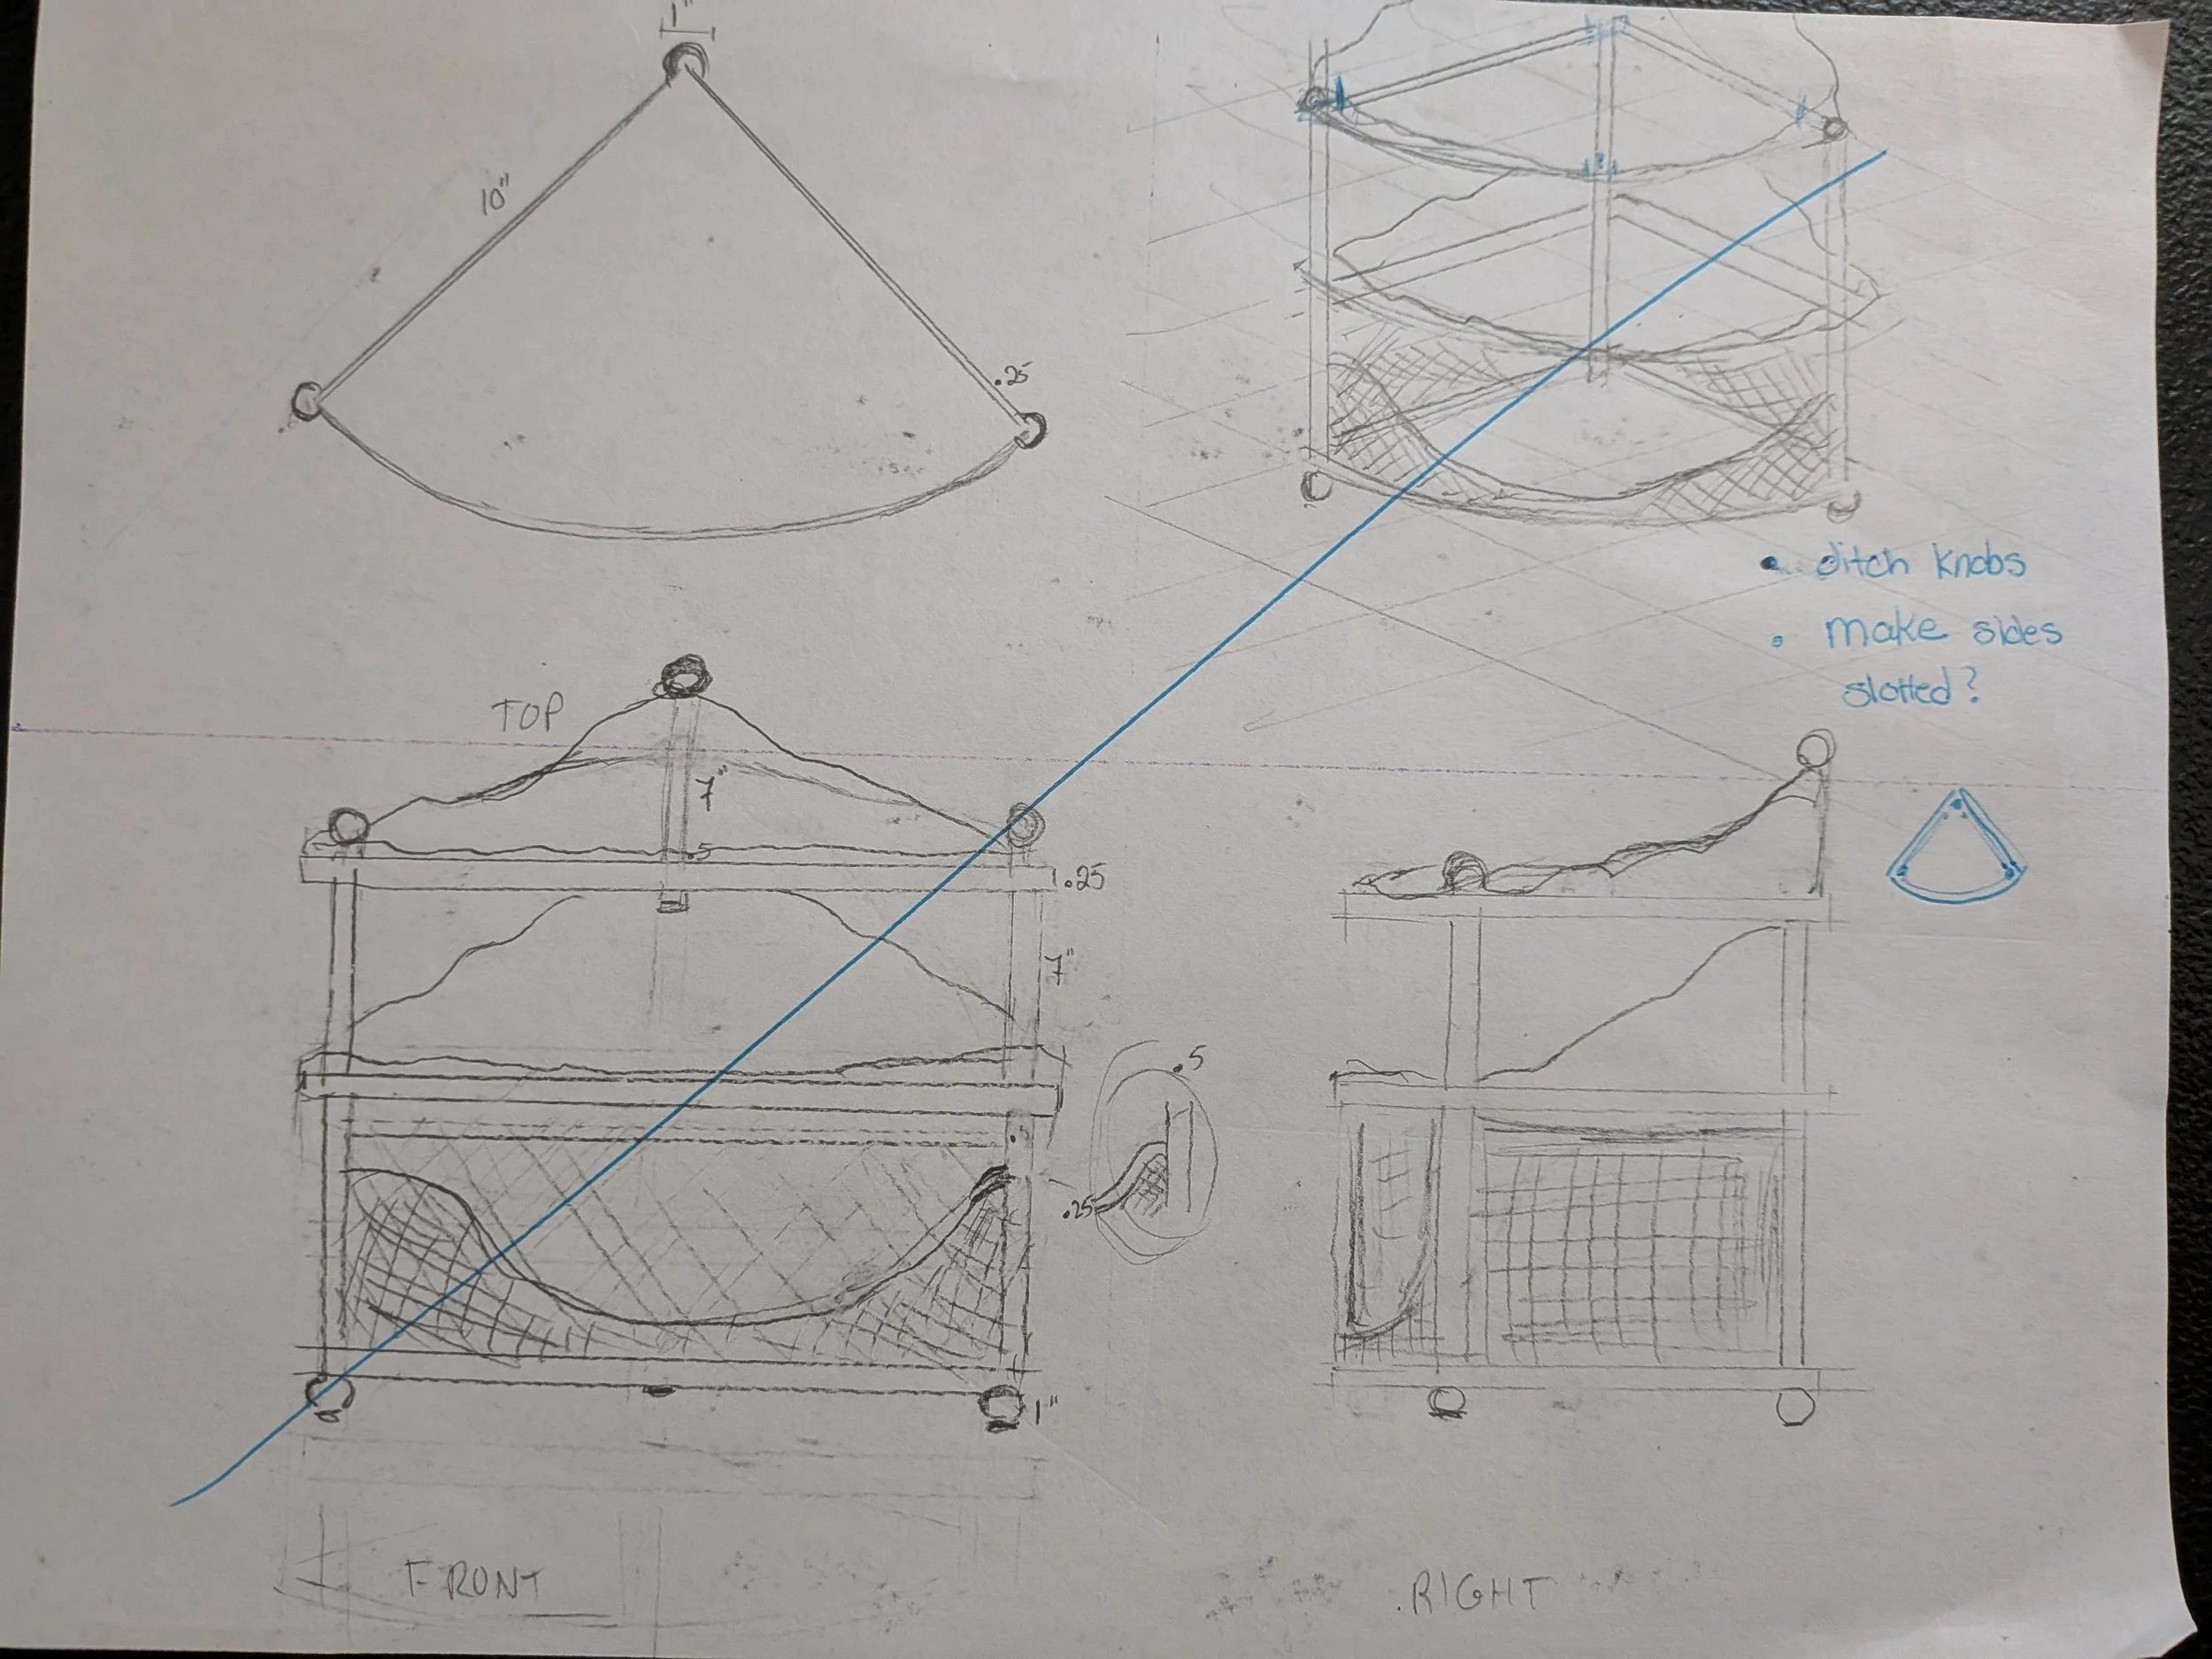
I’m going to start with the top tier. What I have in mind is a quarter circle, with scalloped sides that meet in the back, and a pretty fenced front on the arc. I might scallop the fence.
The center tier will have the front fence repeated on the arc. For the two sides, I’m going to repeat the top design. The bottom tier will be different in that I want more of a basket, a net-like cage with a scooped-out front. I sketched out a repeatable pattern for the cage. I am not sure how I’m going to model it. I know what I want it to look like though, and I will figure out the rest.
Armed with some sketches, a couple of drafts, and a picture in my head, I’m ready to slay the beast.

Slaying the Beast aka Creating a Wave Pattern
I started by opening the settings menu and changing the units to Imperial. I then changed the workplane to 13” x 13”, only a bit smaller than the actual printbed.
After that, I opened up Tinkercad and got designing, first creating a 20” diameter circle, which I colored a bright yellow to make it stand out. I then added a pair of 20” squares, using one to cover the right half of the circle, and the other to cover the top half. I turned both squares into negative space, then combined the lot, leaving me with a bright yellow quarter circle to use as the base.
I cleared the workspace with CTRL-H, then began work on the top tier panels, a pair of twin wavy backboards that meet at the center. My earlier sketches gave me an idea on how to make the curves. Now to see if I can put it into action!
If this part were rectangles instead of waves, it would be made of 3 rectangles that total 10 inches long, and the highest point would be 7 inches tall. I think proportions like this would look balanced: the first section 6 inches long and 4 inches high, the second section 3 inches long and 6 inches high, and the last section 1 inch long, but seven inches high. I created the required parts, aligned them end to end, and narrowed the piece to .25 inches.
I noticed on my sketches that the chunk I cut away when sculpting an arc could be inverted, then added to the next rectangle to create a seamless wave. I’m going to try that right now. I have another idea in case this doesn’t work, but I really want it to work. I’m going to start with the short but wide rectangle and go from there.
I copied the red block, then colored the copy purple so I could tell it from the original. I then created a light purple circle 2 inches across and a quarter inch thick, then aligned it to match the top left of the box. I intend to remove the circle shape by turning it into a shadow, then combining it with the purple box, leaving two pieces separated by a round hole.
After that there will be a small triangle missing an arc on one side of the hole, as well as the entirety of the remaining large rectangle on the other side. It’s the triangle shape that I intend to invert and place on the top right of the red brick, in order to add a smooth curve leading up to the next rectangle. The huge rectangle needs to be erased completely, doable with a pair of eraser rectangles.
Combining the two then erasing the remnants of the rectangle may leave me with the piece I need for part of this shape, but that will also remove the part I want to make a custom shaping piece out of. So before I do any of that, I’m making a copy of my purple-on-purple. The copy will be purple with light blue.


I switched the light purple to shadow, then merged the dark purple box with all the negative space, resulting in the perfect triangle. It was at this point that I realized that I didn’t need the second dark purple square at all. I had everything I needed with that little triangle shape; a copy of it, turned into an eraser and attached to the upper left corner would give me a nice rounded edge. I deleted the unnecessary box.
I’m not sure my sizing will work, so before I go changing things, I’m going to copy my rectangle setup. I hit the light bulb button up top, and voila! My hidden rectangle setup and base appeared! I made a quick copy of the rectangles, then hid the copy away, along with the base. Now I had just a single rectangle setup and two tiny purple triangles left to work with. I attached one triangle to the end I wanted to round out, and made it into a shadow, then inverted the other triangle and put it up top. Combining these made the proper shape.


I used the same triangle creation technique as before on the second rectangle, changing the size of the circle to 1” diameter instead of 2” to account for the change in width from 6” to 3”. I removed the circle shape, along with the large part of the remaining rectangle, and used the tiny triangle that was left and its duplicate to work the same magic on the middle rectangle.
A step back to look, and I am extremely displeased with the curves. They worked beautifully, perfectly, wonderfully. And yet. And yet, the curves are STEEP and sharp, not smooth and flowing. I need a larger circle in both cases. I’m not going to bother with the last rectangle until I finish a redo of the first two.
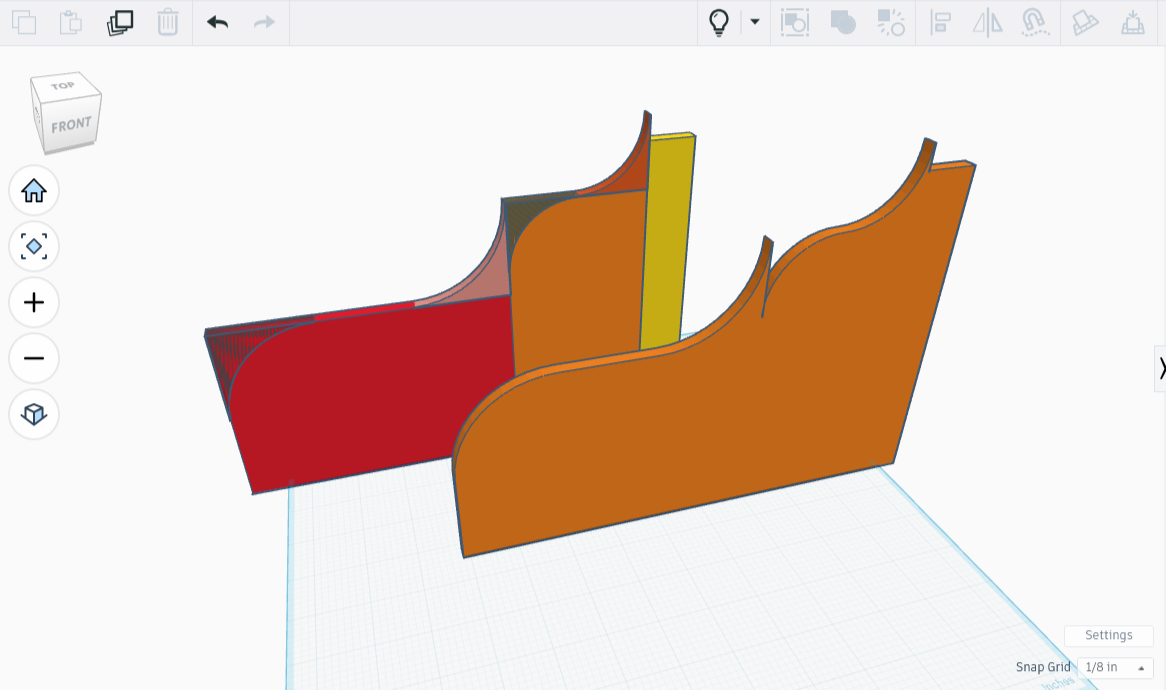
I made the next attempt using a 4 inch circle for the first, a 3 inch circle to create the second arc, and a one inch circle for the third. It went well until I went to put the finished pieces side by side. They did not mesh, as you can see in the illustration. However it looked like an easy fix.
I lowered the first rectangle to three inches in height, and when I added the triangle pieces again they fit seamlessly. And wherever anything didn’t, I broke the entire rectangle apart and increased the size of the circle just a hair. Recombining it was almost a success - my seamless blends didn’t hold up once I tried joining it all together. It was almost good enough, but not quite.
The final product below is nearly how I imagine the top looking, save for the nicks that need ironed out. I can’t say I’m fond of the second curve though. I’ll rework it a bit by changing the size of circles a fraction, and nudging some parts here and there.
Except things didn’t work out, and all that gentle nudging kept leaving the same four or five cracks, consistently. I finally tackled each rectangle/wave individually, then scooched them into place before combining the lot, to better result.
The wave pattern finally acceptable, with cracks largely repaired and the lines made more flowy, I merged them together permanently. I then made a copy, then CTRL-H’d it out of sight.
While the piece will need finishing, the plan for the waves worked. I am pleased about that.