Custom Design: Compliant Sink Plug with Strainer
Deciding on a Design
Our kitchen sink needed a new strainer. I think I could design a good one especially for our needs. It also sounds like a fun challenge, how to make a round compliant plug with straining capability. It should probably use food-safe plastic, if we have any.
I decided on a round shape with print-in-place technology to make it slightly flexible, so the weight of whatever gets put in the sink will bend the strainer rather than break it (assuming someone puts something heavy there, which people keep doing).
For that it will need nested rings with perhaps two dozen evenly spaced gaps along each ring’s track. The gaps should be shaped like rainbows. That even and perfect spacing will allow the piece to flex, as well as give space for the liquid to seep through the holes.
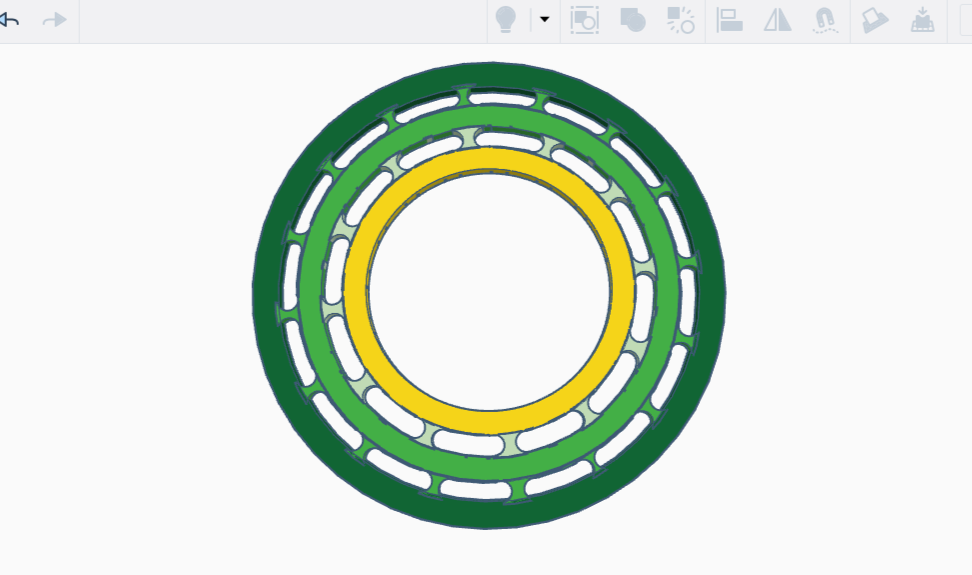
The rings will get joined together again later, after I add the gaps and the center piece. For now having different colored rings helps me to visualize the tracks that the gaps run along, as well as the border.
The inner portion should be solid, so as to keep anything from falling into the sink. It also needs a handle. A wide short cylinder will do nicely here, with beveled edges for function (fit) and beauty (the beveling tool will make it look finished and professional).
I’ll place the beveled cylinder in the middle of the nested rings, the ones holding the evenly spaced gaps. After that, a sphere placed three fourths of the way down should do nicely for a handle.
Since the design will basically be two parts, a flexible strainer on the outside, a plug on the inside, I’m going to break this into two separate articles. Part One, this part, will cover how to make printable flexible rings. In Part Two we’re going to learn how to make a tapered plug that can form a seal.
I got out my caliper and took some measurements. I then opened Tinkercad and got to work.

Sink Design Plus Scraps:
Concentric rings, arcs, a cylinder, a flexible mat, a ring, and a sink drain (cc from left)
Creating All the Rings
For this project, I wanted five concentric rings. The three oddly-placed rings (rings 1, 3, and 5) would be borders, while the evenly placed rings (rings 2 and 4) would hold the flexible strip technology. I started here.
All the rings needed to be .25” thick. To create each ring, I first made a cylinder of the appropriate size, then a cylinder that was half an inch in diameter smaller. I centered the two, turned the smaller one into an eraser shape, then joined them. Voila, a perfect ring, with .25” thickness all the way around.
The outermost ring was 5.25” across, the next 4.75”, the third 4.25”, the fourth 3.75”, and the innermost was 3.25”. I colored the rings each a different color at this point so that I could more easily see what I was doing.
Creating Rounded Arcs for the Flexible Rings
The next step was to make the rings flexible. I like the print in place flexible strips I had made earlier; I felt like more give would let it resist the weight of heavy kitchen items, while the holes would provide drainage. Win!
I copied the second ring, which was adjacent to the outermost ring. Then I made two giant eraser-shaped boxes. I placed those boxes side by side, afterwards moving them apart on one end and overlapping together on the other. I only moved them a little bit though, then they got placed over the ring, leaving only a tiny bit of arc untouched. I merged the whole thing, leaving a small chunk of ring.
Unfortunately it had a squared off end. I wanted a rounded end. I’m not an engineer — maybe a squared off end would work, but it didn’t feel right. I made a pair of cylinders the same height as the arc and .25” diameter. One of these attached to the end of each arc left me with a near-perfect jellybean shape.
Notice ‘near-perfect’ — there was a little piece sticking out where I had struggled to join the parts. I made a very small cube, turned it into an eraser, and cleaned up the loose edge. Now it was truly perfect.
Putting Together Flexible Rings
I then made another copy of the ring this arc was based on. I turned that copy into an eraser shape not because I wanted to erase anything, but because the ring needed to be invisible in order to be useful.
I put the arc on the ring, and it fit perfectly. I made a copy of the arc, then rotated the ring plus the original arc 180 degrees. That left me with a ring that had an arc on each side, facing each other. I copied the pair of opposing arcs, then rotated the ring again, copying and rotating until my ring was filled with perfectly spaced arcs.
Next, I made the ring invisible by using CTRL-H, to hide it, then turned all the arcs into eraser shapes. I clicked the light bulb shape on top, revealing what had been hidden. Combining the shapes created a new shape that resembled an oddly-studded collar. I repeated these exact steps with the fourth ring, the one that’s only a position away from the inside, leaving me with two spiked ring shapes.


Joining Five Rings To Make One Flexible Ring
I added these spiked rings back to their respective positions between the first, third, and fifth rings. A quick use of the align tool made sure they were in place, then I joined all five rings together, spikes and all. This left me with a single disk with an empty slot in the middle, and two rings of evenly spaced rounded arcs, sandwiched between borders of equal width.
With the flexible mat that doubles as a strainer finished, it was time to move on to the center: the tapered plug (part 2).
3D-Printable Strainer, Part One of the Compliant Kitchen Sink Plug with Strainer