Working with a Client: Managing Expectations in 3D-Printed Design
I’ve been asked if I could design an art supply station. For someone who looks at my designs and thinks they’re cool, you bet I am going to make time for this one!
I do a fair bit of designing for other people, including friends, family, and people that want to give me money. Regardless of the client, there are certain expectations, both on client side and designer side, that need addressed if we are to end up with a project that leaves the client happy, and us not completely frazzled.
What is the purpose of the project?
The very first step in making a custom design is communicating with the client about what they want. First, we talked about what this art station would be used for, to get an idea of how much space was required. The art station was going to hold certain art supplies, with space on the outside for crayons.
We decided on two drawers, each big enough to hold safety scissors and glue sticks. The drawers need handles, and they should be stackable, with feet underneath to keep the station off the ground.
There should be a tray sticking out from the side, its base flush with the bottom drawer. This tray is for holding crayons, which the client wants flat. It is going to need some way of being joined to the drawers without being ugly. I think modular is the way to go here, given the size limitations of the printer. That will also let us maximize the drawer space.
Initial Sketch, First and Second Drafts
We each made a sketch showing how we were conceptualizing the finished item. I am going to turn this rough sketch into a nice one, to make sure it’s exactly right before presenting it. After the last sketch is approved, we’ll do a Tinkercad mock-up. For now, I presented the initial drawing, based on my understanding of the task.
This step is likely the first time the client has been able to really visualize what the part would look like if it were done (unless they presented you a sketch first!) On seeing it, they might want to make some changes, which is exactly what happened here.
After comparing our sketches, we looked over what parts were right and which bits needed changed. I threw together a pair of more serious sketches, with dimensions and depth. The first showed a pair of stacked drawers, each 2.5” high, in a 6” long and 5.5” high case. Since I made the side tray a 4” by 4” square with 1” rails, I decided this storage container should also be 4” deep.
I then drew three feet underneath, two under the storage container and one under the sidecar. The 3rd foot looks weird and out of place so I’m going to give the side tray feet of its own instead. Next sketch though.
Presenting Options
The second sketch had the same pair of stacked drawers, with these differences: the drawers were 8” long instead of 6”, and the top one was 2” high, while the bottom was deeper, at 3”. The side tray was the exact same, though this sketch lacked feet altogether. Oversight on my part, the final version will have feet.
I presented the pair of sketches to the client so that they could see how a 6” long piece looked with a side bin, vs an 8” one, also with a side bin. The client chose the longer option, so I used that one for the last sketch.
Final Draft
The design was mostly satisfactory, although the crayon section was unattractive at any size, the sheer width of it rather offputting. Not a problem, I had an eraser! With it narrowed, everything passed. The final sketch approved, I decided to do a Tinkercad mock-up.
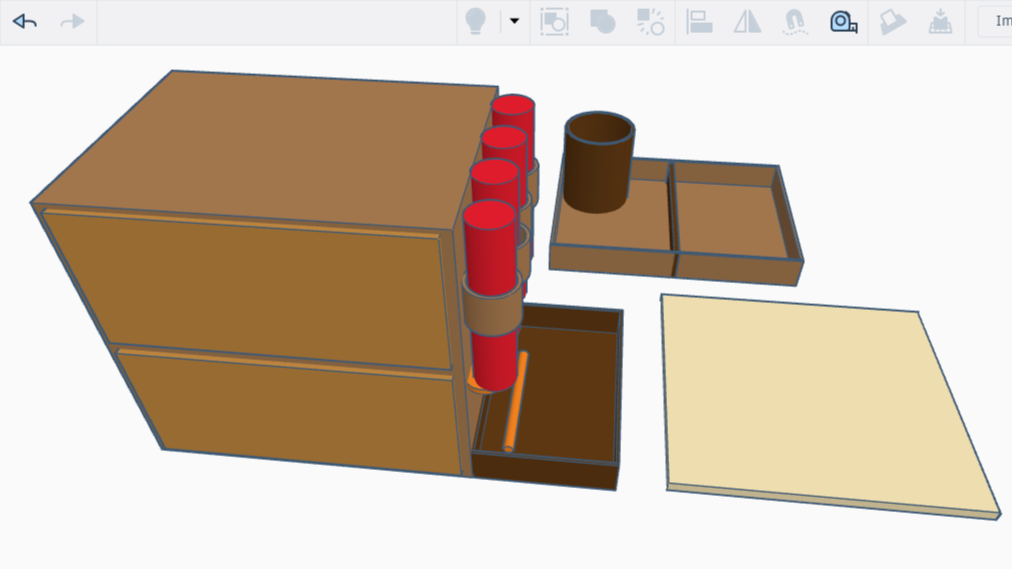
A Tinkercad Mockup of a Two-Drawer Unit, a Side Panel holding Glue Sticks, a Tray holding a Crayon, a Board for Writing, and Divided Bin with Cup
The Mock-Up
We got on video chat, then I pointed my camera at the computer, while the client watched me put up rectangles where there would be drawers, a flatter one for the tray, and no knobs or handles. I don’t think we even had feet on the mock-up. Still, it would be a great way to see the project before print, as well as make any last-minute changes.
Seeing the project in 3D for the first time impressed the client with new possibilities. We could put holders for glue sticks on the side, above the crayon tray. Could we add holders for scissors on the other side, perhaps? Yes we could! I looked up the size of glue sticks and safety scissors, then used those dimensions to make and place mock-ups of the new holders.
I offered to make the top into a bin, like my toolbox. This was a problem because the space was needed for drawing. I considered a bit. I could add a slot on the back, and print a separate drawing tray. I offered this next, and we went with that: a portable tray with a holder on the back, and a bin on top.
I added those things, and the art station was shaping up nicely. Could we divide the top into two bins, perhaps, and fix a cup to one? I did that, suggesting a removable cup instead, with a slot, but no. They wanted a stationary one. They also wanted a separate matching portable one.
The design now thoroughly mocked up in Tinkercad, we gave it a lookover. What did we want those drawers for again? Ah, the gluesticks and scissors that are now going on the side. That’s more than fine because now there will be two drawers freed up for other art supplies.
Creation
With the mockup and commentary complete, it was time to create the real thing. Much of the work involved duplicating parts of the mock-up, then altering them appropriately. A few things weren’t on the original, like feet, knobs, and dovetail joints. The client had a very specific style of knob in mind, and sent images, which I was able to recreate.
Presentation
After the additions, I presented it to the client, a ready-to-print design. I showed the dovetail joints, there to slide the side bins into position and hold them securely in place. Here were the feet, similar in proportion and placement to the client’s original sketch, and a matching set of feet under the divided bin, allowing it to attach to the top of the unit.
We had met all the objectives set out in the original design, and added a couple of features that made it workable or better. Satisfaction!
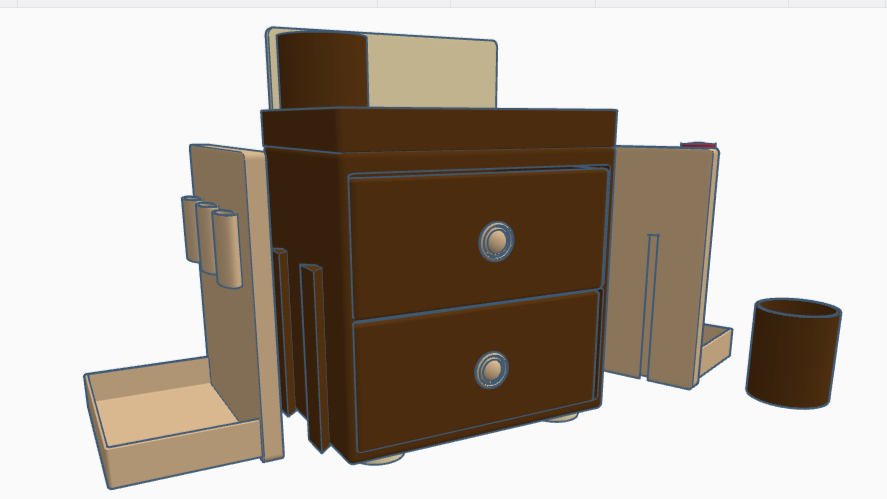
Model of a Footed Art Station Drawer Unit, with Two Knob-Handled Drawers, A Top Bin with a Cup in it, Two Side Panels with Bins, and a Cup. The Drawer Unit has Visible Dovetail Joints.
Delivery
The last expectation on the part of the client is that they are delivered a working finished product. To do that, I clipped and printed a portion of the dovetail joints and slots, to make sure they fit. They did not. They were in fact off by .05mm, can you believe it??? I also checked the feet and slots, and the space for the tablet. After making any necessary adjustments, it was time for the print.
Next, the assembly needs checked. Does the parts slide together? Does the tablet fit? Do the feet of the paint tray (divided bin) fit into the slots on the drawer unit? After testing we expect it all to work by print, but surprises could happen, or we might have made a mistake.
After checking the assembly, the details: Can it really hold the scissors and glue sticks? We can make mock-ups of those parts if we need, just to check.
And does it looks good? While we try to minimize support use without compromising the unit, we still end up with it on the piece in places. Did we get it all off? Does our piece look smooth, even, without scarring or jagged bits?
Once it assembles correctly, all the pieces work the way they are supposed to, and the model has been finished (cleaned of support material and made to look its best), then we are ready to hand over the product of our collaboration.
Summary
Knowing our client’s needs let us focus on how we could improve it, even including suggestions. It also means that our client knows that their work is getting attention, so even if it takes a while to get done, they don’t feel ignored or forgotten. Having set the expectations with the client at every step made the whole project a breeze.